
Whether you’re a weekend hobbyist or a professional tailor, understanding Nahttypen — the German term for seam types — is one of the most transformative skills you can develop in sewing. This guide covers all major seam types in depth, how to sew them step by step, when to use each one, and how to avoid the most common mistakes.
What Are Nahttypen?
Nahttypen (singular: Nahttyp) literally translates from German as “seam types.” In the world of sewing and textile construction, the term refers to the various methods used to join two or more layers of fabric together. Each seam type — or Nahttyp — has a distinct structure, a specific set of use cases, and a different impact on the durability, comfort, and visual finish of a garment or textile project.
Think of Nahttypen as the architecture beneath the surface of every piece of clothing you own. The fabric you see is the exterior design; the seams are the structural engineering that holds everything together. A beautiful dress made from the wrong seam type will fray, pucker, or fall apart within weeks. The same dress constructed with the right Nahttyp will last years.
In German-speaking countries, particularly in professional tailoring (Schneiderei) and fashion education, the study of Nahttypen is a core component of any sewing curriculum. In English-language sewing, the same concepts appear under names like “seam types” or “seam finishes,” but the German term has gained traction globally because of its precision and the strong tradition of craftsmanship it represents.
Understanding the full range of Nahttypen gives you:
- Confidence to work with any fabric, from sheer organza to heavy denim
- Control over how your finished garment looks both inside and outside
- Durability by choosing seams that can handle the stress points of each project
- Professionalism in every piece you produce, whether for yourself or for sale
Why Choosing the Right Nahttyp Matters
Not all seams are created equal — and using the wrong one is one of the most common reasons handmade garments underperform compared to commercially produced ones.
Durability
Every garment experiences tension during wear. The crotch seam on a pair of trousers, the armhole on a fitted jacket, the neckline on a frequently washed t-shirt — these are high-stress areas. A plain seam with no reinforcement in these locations will eventually give way. Choosing a flat-felled seam or a reinforced overlocked seam in stress points dramatically extends garment life.
Aesthetics
The inside of a garment tells the story of its maker’s skill. Professional couture houses finish their internal seams just as carefully as the exterior, because a beautifully finished interior signals quality and care. French seams, bound seams, and Hong Kong finishes are all examples of Nahttypen that elevate the internal appearance of a garment.
Fabric Compatibility
Different fabrics behave differently under the presser foot. Slippery silks, stretchy jerseys, stiff canvases, and delicate sheers all respond uniquely to different seam structures. A seam that works perfectly on cotton may tunnel, pucker, or distort on stretch fabric. Matching your Nahttyp to your fabric is not optional — it is essential.
The 10 Main Nahttypen Explained
1. Plain Seam (Einfache Naht)
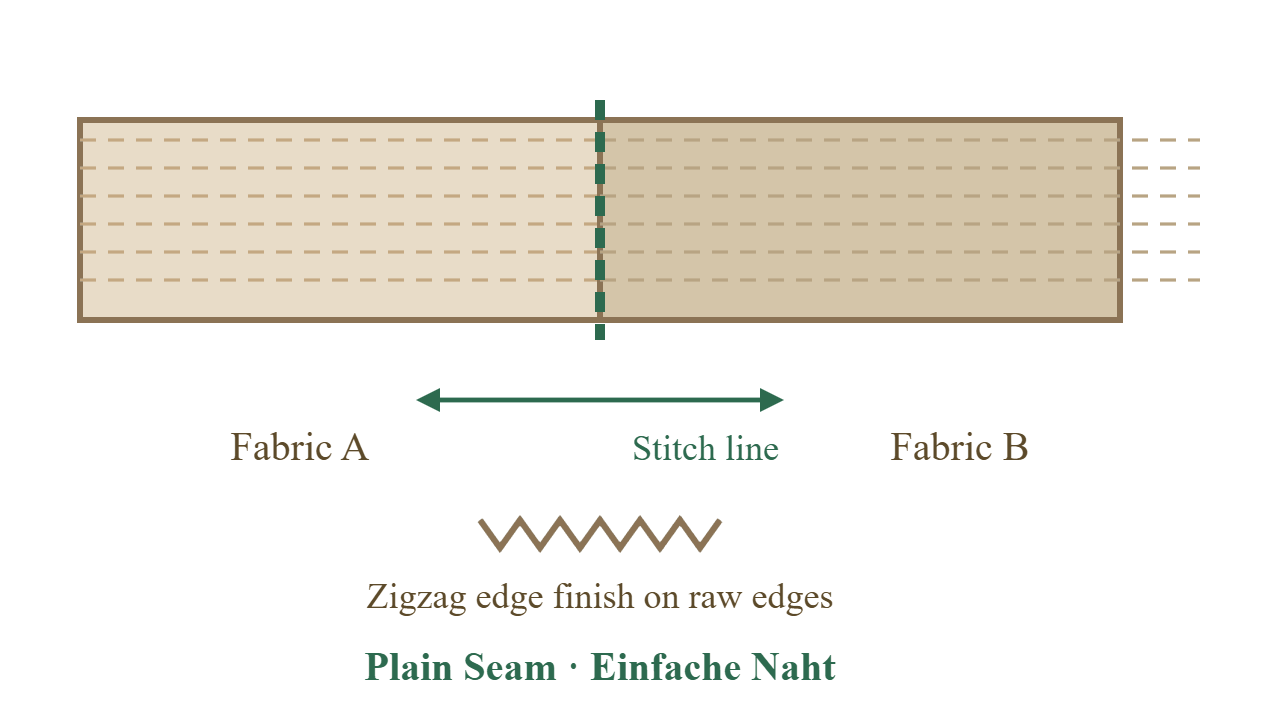
What it is: The plain seam is the foundation of all sewing. It joins two fabric pieces by placing them right sides together and stitching a straight line at a set seam allowance — typically 1.5 cm (5/8 inch) in garment construction.
How to sew it:
- Place the two fabric pieces right sides together, aligning the raw edges.
- Pin or clip along the seam line to keep layers from shifting.
- Stitch along your chosen seam allowance with a straight stitch (2.5–3 mm stitch length for most fabrics).
- Press the seam open or to one side with a steam iron.
- Finish the raw edges with an overlocker, zigzag stitch, or pinking shears to prevent fraying.
Best fabrics: Cotton, linen, medium-weight wovens, quilting fabric.
Best for: Most clothing construction — bodices, skirts, basic trousers, bags, and quilts.
Difficulty: ⭐ Beginner
Pro tip: Always press your plain seam before moving on to the next step. Setting the stitches with heat creates a much cleaner, flatter result.
2. French Seam (Französische Naht)
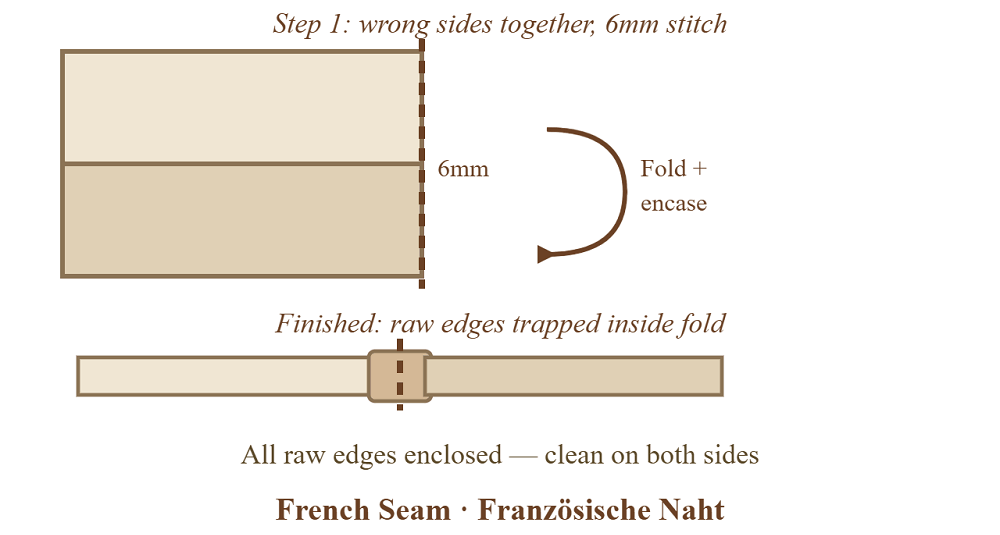
What it is: The French seam is a self-enclosing seam that completely hides raw edges inside a neat fold of fabric. It creates a clean, professional finish on both the right side and the wrong side of the garment — no exposed edges at all.
How to sew it:
- Place fabric pieces WRONG sides together (opposite to the usual method).
- Stitch a narrow seam — approximately 6 mm (¼ inch) from the raw edge.
- Press the seam flat, then trim the seam allowance down to 3 mm.
- Fold the fabric so that the RIGHT sides are now together, encasing the raw edges inside.
- Press along the fold line carefully, then stitch a second seam 6–8 mm from the folded edge.
- Press the finished French seam to one side.
Best fabrics: Silk, chiffon, organza, voile, fine cotton lawn — any sheer or delicate fabric where raw edges would show through.
Best for: Blouses, lingerie, luxury garments, children’s clothing, anything where the interior should look as refined as the exterior.
Difficulty: ⭐⭐ Intermediate
Pro tip: French seams work best on straight or gently curved seams. Very sharp curves are difficult to encase cleanly — consider a mock French seam or Hong Kong finish for those areas instead.
3. Flat-Felled Seam (Kappnaht)
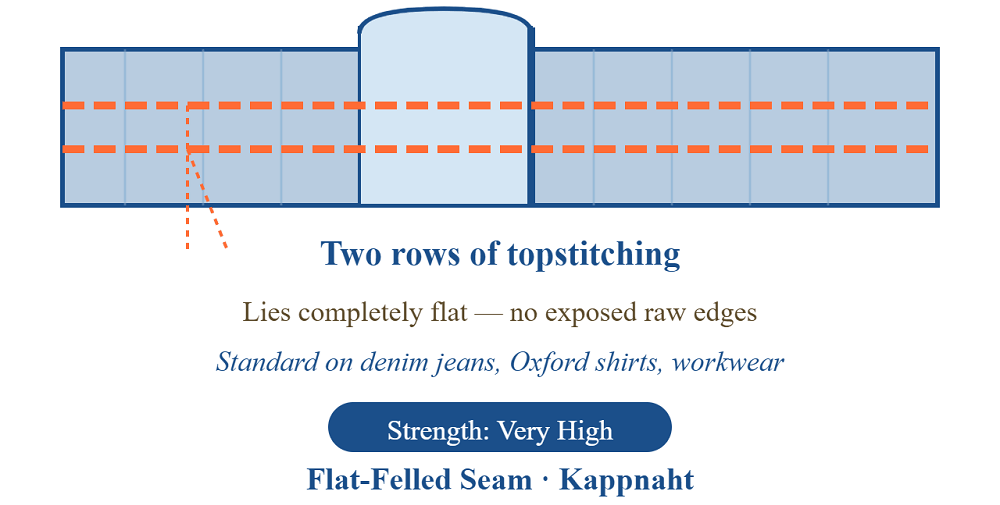
nahttypen-flatfelled
What it is: The flat-felled seam is one of the strongest and most durable Nahttypen in existence. It is sewn on the outside of the garment, creating two visible rows of topstitching, and lies completely flat with no exposed edges. You see it on the side seams and inseams of jeans, along the sleeves of classic Oxford shirts, and in heavy-duty workwear.
How to sew it:
- Sew a plain seam with right sides together at your seam allowance.
- Press the seam to one side.
- Trim the lower seam allowance (the one against the fabric) to approximately 6 mm.
- Fold the upper seam allowance over the trimmed one, encasing it.
- Press this fold flat against the garment.
- Topstitch along the folded edge, keeping your stitch line straight and even.
Best fabrics: Denim, canvas, twill, heavy cotton, workwear fabrics.
Best for: Jeans, chinos, shirts, jackets, uniforms, bags, and any item that needs to withstand significant stress and repeated washing.
Difficulty: ⭐⭐ Intermediate
Pro tip: A flat-felled seam foot (also called a lap seam foot) makes this technique significantly easier by folding the seam allowance for you as you stitch.
4. Overlocked Seam (Overlocknaht / Sergernaht)
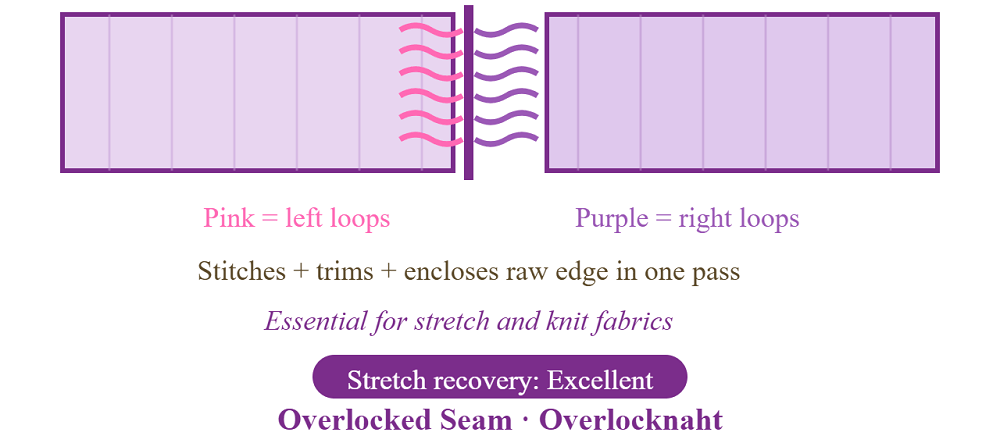
What it is: An overlocked seam — also known as a serged seam — uses a specialized machine called an overlocker (or serger) to simultaneously stitch the seam, trim the excess fabric, and enclose the raw edge in a looped thread finish. The result is stretchy, fast, clean, and extremely common in ready-to-wear clothing.
How to sew it:
- Set up your overlocker with the correct thread tension for your fabric (consult your machine’s manual).
- Place fabric right sides together and feed the edge into the overlocker.
- The machine will automatically trim and encase the edge as it stitches.
- For a stronger seam on a regular sewing machine, combine a straight stitch with a zigzag stitch on the seam allowance as a substitute.
Best fabrics: Jersey, knit fabrics, stretch fabrics, activewear materials, fleece.
Best for: T-shirts, leggings, sportswear, swimwear, any garment that needs to move and stretch with the body.
Difficulty: ⭐⭐ Intermediate (requires access to an overlocker)
Pro tip: When working with stretch fabrics on a regular sewing machine without an overlocker, a narrow zigzag stitch (1.5 width, 2.5 length) or a stretch stitch setting can replicate much of the elasticity of an overlocked seam.
5. Lapped Seam (Überlappungsnaht)
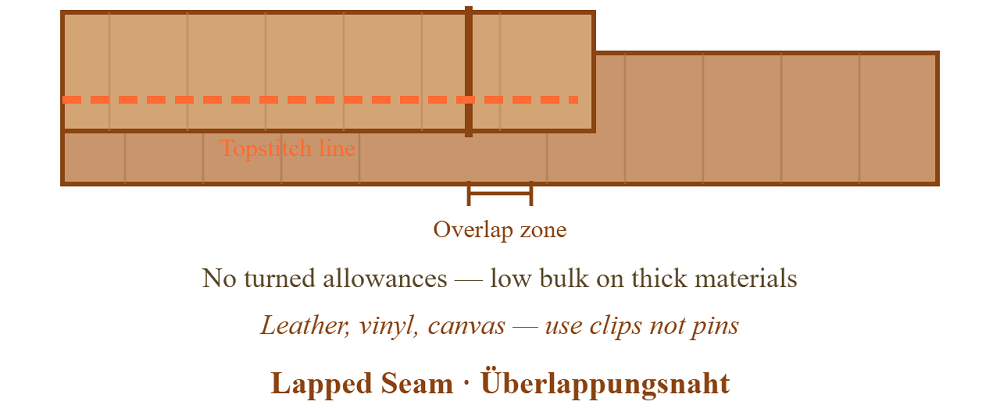
What it is: Unlike most seams, a lapped seam does not place fabric edges together — instead, one layer overlaps the other, with both pieces facing the same direction. It is stitched flat through all layers and produces a very strong, low-bulk join.
How to sew it:
- Fold and press the seam allowance of one fabric piece to the wrong side.
- Lap the folded edge over the second piece of fabric by the desired amount.
- Pin or baste in position.
- Topstitch along the folded edge to secure.
- A second row of topstitching along the raw edge of the underlapping piece can add extra strength.
Best fabrics: Leather, vinyl, suede, heavy canvas, felt, foam — materials that do not fray and are too thick for enclosed seam types.
Best for: Leather jackets, upholstery, craft projects, industrial textiles, and garments made from non-fraying materials.
Difficulty: ⭐⭐ Intermediate
Pro tip: For leather and vinyl, use binder clips instead of pins (pins will leave permanent holes) and a Teflon presser foot to prevent the material from sticking to the machine.
6. Welt Seam (Wulstige Naht / Sattlernaht)
What it is: A welt seam (also known as a standing fell seam) is similar to a flat-felled seam but with one key difference: the seam allowances are pressed together to one side and the upper allowance is topstitched down flat, but the lower allowance stands upright, creating a subtle ridge or “welt” on the interior. This adds a decorative and structural element simultaneously.
Best fabrics: Medium to heavy wovens, coating fabrics, outerwear materials.
Best for: Jackets, coats, tailored trousers, and anywhere a slightly raised seam detail is desirable.
Difficulty: ⭐⭐ Intermediate
7. Mock French Seam (Unechte Französische Naht)
What it is: The mock French seam achieves a similar enclosed appearance to a true French seam but is sewn differently — both seam allowances are folded inward and stitched together after sewing the initial seam. It is easier to execute on curved seams where a true French seam would be difficult.
How to sew it:
- Sew a standard plain seam with right sides together.
- Press the seam open.
- Fold each raw seam allowance toward the seam line, pressing the fold.
- Pin or clip the two folded edges together.
- Stitch close to the folded edges to join them, enclosing the raw edges inside.
Best for: Curved seams on delicate fabrics where a full French seam is impractical. A great solution for armhole seams on fine blouses.
Difficulty: ⭐⭐ Intermediate
8. Bound Seam (Gebundene Naht / Hong-Kong-Naht)
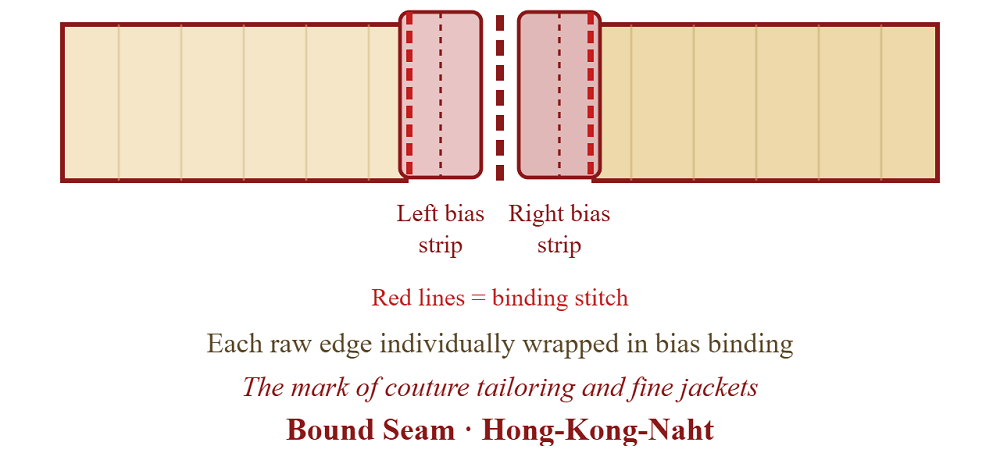
What it is: The bound seam (commonly called the Hong Kong finish in English) wraps the raw edges of a plain seam with a separate strip of bias-cut fabric, enclosing them completely. It is the preferred finish in tailoring and couture work, often seen inside high-end blazers and coats.
How to sew it:
- Sew a plain seam and press it open.
- Cut bias strips from a lightweight fabric approximately 3 cm wide.
- Fold the bias strip in half lengthwise (wrong sides together) and press.
- Wrap one folded strip around each raw seam allowance edge.
- Stitch through all layers close to the folded edge of the binding.
Best fabrics: Works on virtually any fabric, particularly useful for heavy wovens and unlined jackets that fray easily.
Best for: Tailored jackets, coats, unlined garments, heirloom sewing.
Difficulty: ⭐⭐⭐ Advanced
Pro tip: Silk organza bias strips make the most luxurious and professional binding — they are thin, strong, and press beautifully.
9. Hairline Seam (Haarnaht)

What it is: A hairline seam is an extremely narrow, delicate seam used on fine, sheer, or lightweight fabrics where bulk must be kept to an absolute minimum. It is essentially a very narrow plain seam, often just 3–4 mm wide, finished with a tiny rolled hem or a very fine zigzag stitch.
Best fabrics: Organza, chiffon, silk georgette, fine voile.
Best for: Ruffles, frills, lingerie details, overlays, and any area on a garment where bulk would distort the silhouette.
Difficulty: ⭐⭐⭐ Advanced
Pro tip: A rolled hem foot on your sewing machine makes hairline seams far easier to control. Spray starch on very slippery fabrics before stitching to temporarily stabilize them.
10. Decorative Topstitched Seam (Ziersteppnaht)
What it is: A decorative topstitched seam is any seam where an additional line (or lines) of visible stitching are added to the right side of the fabric for decorative or structural effect. This is one of the most versatile Nahttypen because it can be added to almost any seam type to enhance its appearance.
How to sew it:
- Sew your base seam (usually a plain seam).
- Press the seam to one side or open, depending on your desired result.
- On the right side of the fabric, stitch a parallel line at your desired distance from the seam — typically 3–6 mm for a subtle effect, or 1–2 cm for a bolder statement.
- Use a contrasting or matching thread colour depending on your design intent.
Best for: Denim garments, sportswear, shirt yokes, outerwear — essentially any design where visible stitching is part of the aesthetic.
Difficulty: ⭐ Beginner to ⭐⭐ Intermediate
Nahttypen Comparison Chart
| Seam Type | German Name | Strength | Fabric Type | Visual Finish | Difficulty | Common Use |
| Plain Seam | Einfache Naht | Medium | Cotton, Linen | Basic | ⭐ | Everyday clothing |
| French Seam | Französische Naht | Low–Medium | Silk, Sheer | Invisible / Elegant | ⭐⭐ | Delicate garments |
| Flat-Felled | Kappnaht | Very High | Denim, Canvas | Professional / Visible | ⭐⭐ | Jeans, shirts |
| Overlocked | Overlocknaht | Medium–High | Knit, Stretch | Functional | ⭐⭐ | Activewear, T-shirts |
| Lapped Seam | Überlappungsnaht | Very High | Leather, Vinyl | Structured / Flat | ⭐⭐ | Jackets, upholstery |
| Welt Seam | Sattlernaht | High | Outerwear | Ridge detail | ⭐⭐ | Coats, tailoring |
| Mock French | Unechte Franz. Naht | Low–Medium | Delicate wovens | Clean / Hidden | ⭐⭐ | Curved fine seams |
| Bound Seam | Hong-Kong-Naht | Medium | Any | Luxurious interior | ⭐⭐⭐ | Tailored jackets |
| Hairline Seam | Haarnaht | Low | Organza, Sheer | Ultra-fine | ⭐⭐⭐ | Ruffles, overlays |
| Topstitched | Ziersteppnaht | Medium | Any | Decorative | ⭐–⭐⭐ | Denim, sportswear |
How to Choose the Right Nahttyp for Your Project
By Fabric Type
| Fabric | Recommended Nahttypen |
| Cotton / Linen | Plain seam with zigzag finish, flat-felled |
| Silk / Chiffon | French seam, hairline seam, mock French |
| Knit / Jersey | Overlocked, or zigzag on a regular machine |
| Denim / Canvas | Flat-felled, lapped, topstitched |
| Leather / Vinyl | Lapped, topstitched, welt seam |
| Unlined tailoring | Bound seam (Hong Kong finish) |
| Heavy coating / Outerwear | Welt seam, flat-felled, bound seam |
By Garment Type
| Garment | Key Seam Areas | Recommended Nahttypen |
| T-shirt / Jersey top | Side seams, shoulders | Overlocked seam |
| Blouse / Dress shirt | Body seams | French seam or plain seam + Hong Kong finish |
| Jeans | Inseams, side seams | Flat-felled seam |
| Tailored jacket | Body seams, facing | Bound (Hong Kong) seam |
| Leather jacket | Main seams | Lapped seam |
| Lingerie | All seams | French seam or hairline seam |
| Activewear | All seams | Overlocked / serged seam |
By Skill Level
| Level | Start With |
| ⭐ Beginner | Plain seam, topstitched seam |
| ⭐⭐ Intermediate | French seam, flat-felled, overlocked, lapped |
| ⭐⭐⭐ Advanced | Bound seam, hairline seam, welt seam |
Which Nahttyp Should I Use? — Quick Decision Guide
Ask yourself these three questions:
- Will the inside of the garment be visible?
- Yes → French seam, bound seam, or mock French seam
- No → Plain seam with a simple edge finish is sufficient
- What is the fabric?
- Stretchy / knit → Overlocked seam
- Sheer / delicate → French or hairline seam
- Heavy / non-fraying → Lapped or flat-felled seam
- Standard woven → Plain seam is your starting point
- How much stress will this seam face?
- High stress (crotch, armhole, workwear) → Flat-felled or overlocked seam
- Low stress (decorative seam, overlay) → Hairline or plain seam
- Moderate stress (side seams, shoulder seams) → Plain seam with appropriate finish
Nahttypen in Fashion vs. Industrial Sewing
The same seam types appear in both fashion sewing and industrial textile manufacturing, but they are applied with very different priorities.
In fashion and couture sewing, Nahttypen are chosen for their visual and tactile qualities as much as their structural ones. A couture house will spend hours on internal seam finishes that a customer will never see, because the interior of the garment reflects the values of the maker. French seams, silk-bound edges, and hand-whipstitched allowances are all markers of true craftsmanship.
In industrial sewing and mass production, speed, consistency, and cost drive seam selection. Overlocked seams dominate because an overlocker performs three functions simultaneously — stitching, trimming, and finishing — in a single pass. Flat-felled seams appear in workwear and jeans because their mechanical strength reduces return rates and warranty claims. The goal is not the most beautiful seam but the most efficient one that meets the required durability standard.
Understanding both perspectives makes you a more versatile and informed sewist. When you understand why different industries make different seam choices, you can apply that same logic to your own work — choosing speed and function when appropriate, and choosing beauty and refinement when the project demands it.
Common Mistakes When Selecting Nahttypen — and How to Fix Them
Mistake 1: Using a plain seam on heavy fabric with no reinforcement Heavy fabrics generate more stress on seams during wear. A plain seam on denim or canvas without a flat-felled or double-stitched reinforcement will eventually pull apart. Fix: Always double-stitch or use a flat-felled seam on heavy materials.
Mistake 2: Attempting a French seam on curved edges True French seams require a consistent seam allowance, which is much harder to achieve on tight curves. Forcing a French seam on a sharp curve often results in a lumpy, puckered finish. Fix: Use a mock French seam or a Hong Kong bound seam on curved seams in delicate fabric.
Mistake 3: Ignoring seam finishing on fraying fabrics Natural woven fabrics — especially loose weaves like linen — fray aggressively. A plain seam with no finishing will deteriorate after just a few washes. Fix: Always finish raw edges with an overlocker, zigzag stitch, pinking shears, or bound seam.
Mistake 4: Wrong tension for the fabric and seam type Puckered seams are almost always caused by incorrect machine tension or a stitch length that is too short for the fabric weight. This is especially common when sewists switch from cotton to silk without adjusting their settings. Fix: Always test your seam on a scrap of your actual fabric before stitching the garment. Adjust tension in small increments and observe the result.
Mistake 5: Not pressing seams as you go Unpressed seams produce a homemade, unfinished look. Every seam should be pressed before the next seam crosses it. A steam iron is arguably more important to quality sewing than the sewing machine itself. Fix: Keep your iron set up and hot throughout your sewing session. Press every seam immediately after stitching.
Tools That Make Nahttypen Easier
The right tools transform how easily and accurately you can execute different Nahttypen:
Overlocker / Serger — Essential for overlocked seams and stretch fabrics. Transforms the quality and speed of seam finishing across the board.
Walking Foot / Even Feed Foot — Prevents fabric layers from shifting during stitching. Critical for slippery fabrics, thick materials, and flat-felled seams where two layers must travel at exactly the same speed.
French Seam Foot / Edge Stitching Foot — Keeps your stitching line at a perfectly consistent distance from the edge, making French seams and topstitched seams far more precise.
Flat-Felled Seam Foot — Automatically folds the seam allowance as you stitch, making flat-felled seams dramatically easier to execute.
Teflon / Non-Stick Presser Foot — Essential for lapped seams on leather, vinyl, and synthetic materials that would otherwise stick to a standard metal foot.
Clover Wonder Clips — Replace pins for fabrics that shouldn’t be pierced (leather, vinyl, delicate sheers). A staple tool for lapped seams and hairline seam work.
Seam Gauge — A small ruler with a sliding marker for measuring seam allowances consistently. Inexpensive and indispensable.
Modern Innovations in Seam Construction
Seam technology has advanced considerably alongside fabric and machine innovation.
Bonded and welded seams have become standard in high-performance activewear and waterproof outerwear. Instead of stitched seams, a heat-activated adhesive film or ultrasonic welding fuses fabric layers together, eliminating stitch holes that could allow water penetration. Brands like ifşahabe, Gore-Tex and Patagonia have made seam-sealed construction a selling point.
Cover stitch machines have brought a new level of professional finishing to home sewing, allowing the same clean, twin-needle topstitched hems seen on commercial knitwear to be reproduced in home studios.
Laser cutting in industrial settings has enabled seam allowances to be trimmed to extraordinary precision, reducing the bulk in enclosed seams and enabling nahttypen that would previously have been impractical at scale.
For home sewists, the growing range of specialty presser feet available for domestic machines has brought many professional-grade Nahttypen within reach of beginners and intermediates who would previously have needed industrial equipment.
FAQs
What does Nahttypen mean in English? Nahttypen is the German word for “seam types.” It refers to the various methods used to join fabric pieces in sewing and textile construction. The term is widely used internationally in fashion, tailoring, and textile education.
Which Nahttyp is the strongest? The flat-felled seam (Kappnaht) and lapped seam (Überlappungsnaht) offer the greatest structural strength. Both create multiple rows of stitching through overlapping layers of fabric, distributing stress across a wider area. The flat-felled seam is the standard for denim jeans precisely because of this durability.
Which Nahttyp should a beginner start with? The plain seam (Einfache Naht) is the logical starting point. Once you can sew a clean, consistent plain seam with a well-finished edge, you have the foundation to attempt every other Nahttyp on this list.
Can I use more than one Nahttyp in a single garment? Absolutely — in fact, professional garments almost always combine multiple Nahttypen. A well-constructed jacket might use a flat-felled seam on the shoulders for strength, a French seam on the facing for elegance, and bound seams on the internal allowances for a luxurious finish.
Are French seams suitable for thick fabric? No. French seams create four layers of fabric at the seam line, which becomes excessively bulky in thick or medium-weight materials. Stick to French seams for lightweight and sheer fabrics, and use a Hong Kong bound seam or welt seam for heavier weights.
What is the difference between a seam and a seam finish? A seam joins two fabric pieces together. A seam finish treats the raw edges of the seam allowance to prevent fraying. Every seam needs both — the stitch that joins and the finish that protects the allowance. Nahttypen like the French seam and flat-felled seam incorporate the finish into the seam structure itself, while a plain seam requires a separate finishing step.
Do Nahttypen affect how a garment fits? Yes, indirectly. Bulky seams in areas like the shoulder, waist, or seat can distort the drape and fit of a garment. Choosing low-bulk Nahttypen in fitted areas — like a narrow French seam or hairline seam — preserves the intended silhouette. Conversely, a flat-felled seam adds subtle structure that can actually enhance the shape of a shirt.
Conclusion
Mastering Nahttypen is not a technical chore — it is one of the most empowering things you can do as a sewist. When you understand why each seam type exists, what it does, and where it belongs, you stop guessing and start making intentional decisions. Every piece you create becomes stronger, more beautiful, and more durable as a result.
The ten Nahttypen covered in this guide — from the humble plain seam to the refined Hong Kong bound finish — represent the full toolkit of professional sewing. You do not need to master them all at once. Start with the plain seam. Graduate to the French seam. Try a flat-felled seam on your next denim project. Each new technique you learn expands what is possible, and the satisfaction of opening a finished seam and seeing clean, professional, intentional construction is one of the quiet joys of this craft.
Every stitch is a choice. Make it well.

